Cast Iron Pizzapalooza Weekend
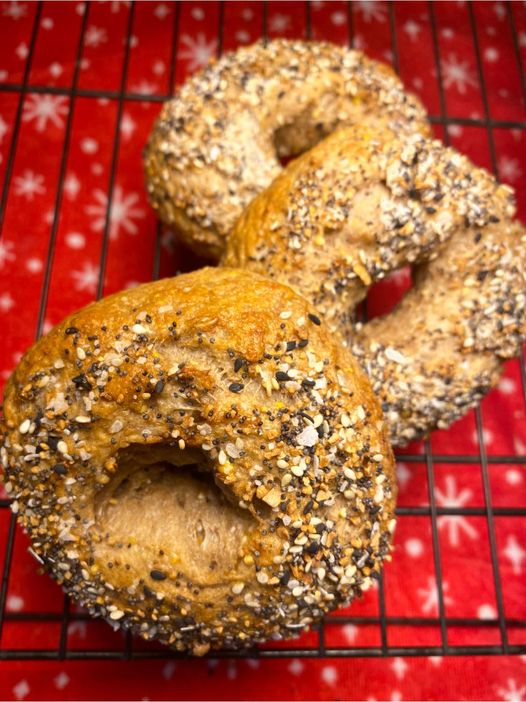
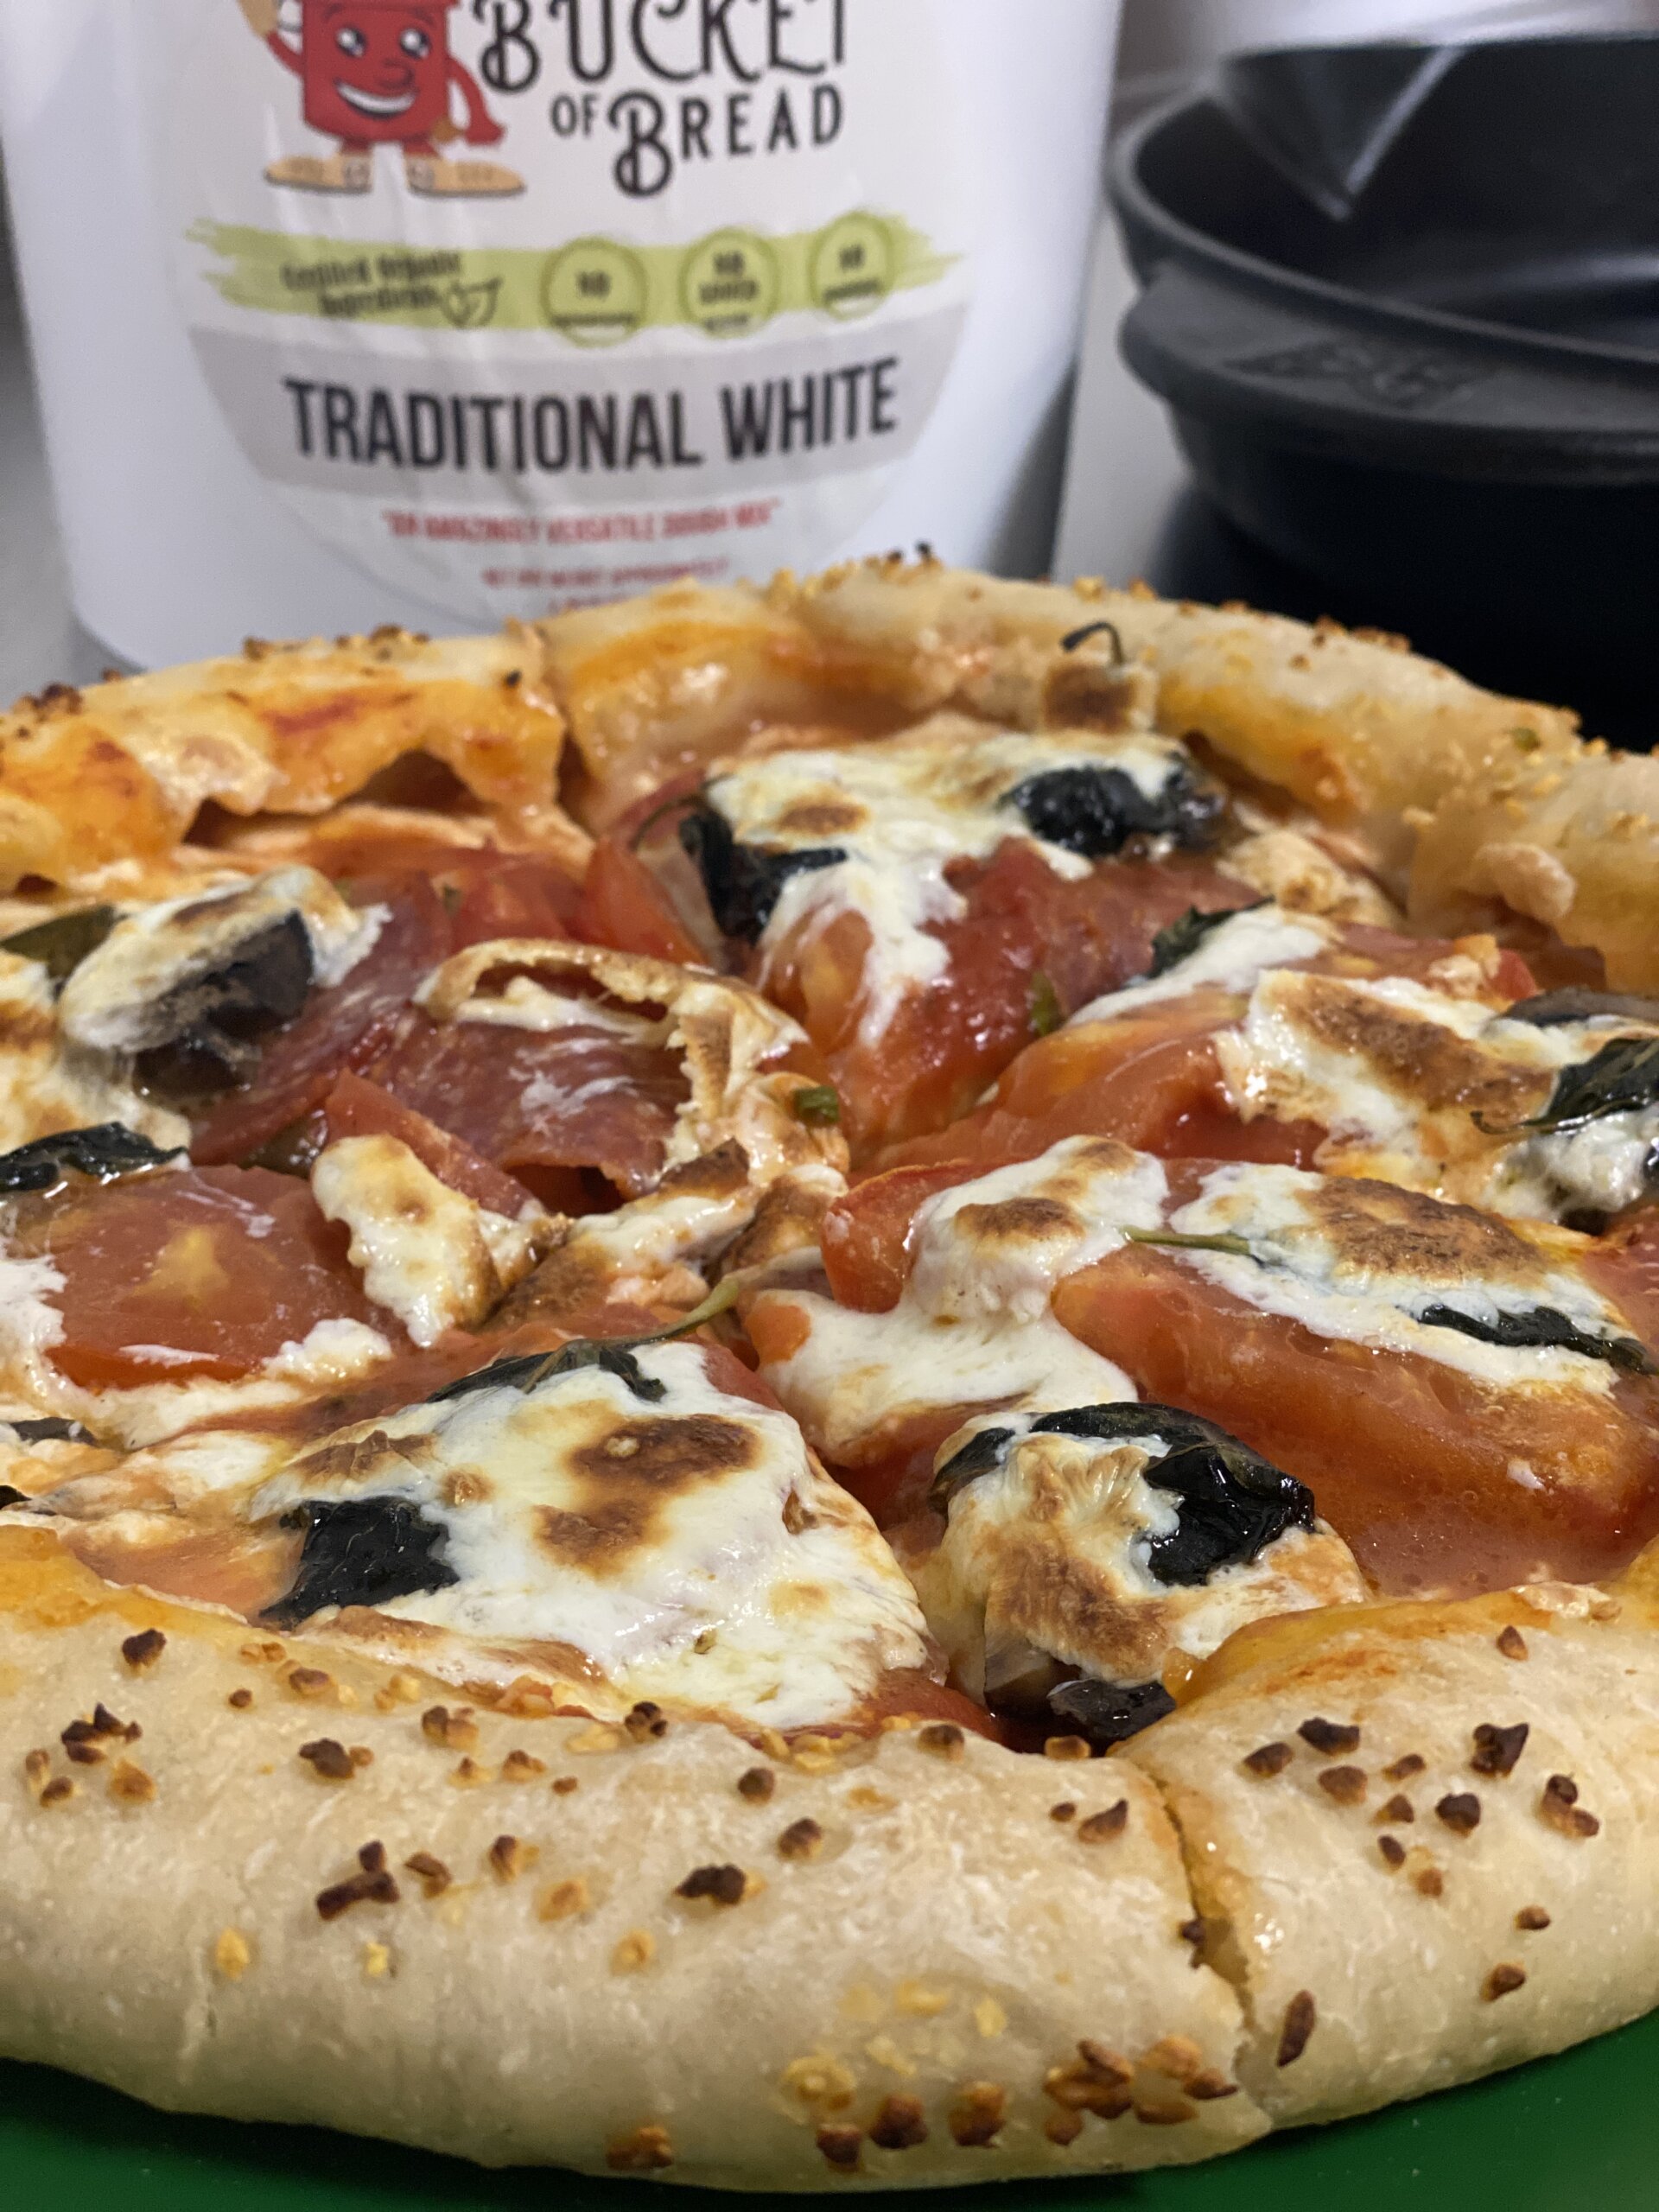
Fabio Morescalchi, a coach at a Brazilian Jiu Jitsu gym in St. Paul, Mn at www.bellumbrazilianjiujitsu.com shared some very impressive pictures/videos of Bucket of Bread being used as a pizza but baked in a cast iron skillet. Coach Morescalchi is a teacher at heart with his favorite part being that of seeing people learn and grow beyond any expectations that they had for themselves. If you have a cast iron skillet and are up for coach's challenge to bake a pizza in it, you're going to love it and never stop using it this way. Coach says, "You can experiment a bit too, try with butter next time. I think the skillet helps give a little different texture to the crust." As for the Bucket of Bread, he also noted, "No such thing as left over dough in my house." So, he made a lot of pizza with his buckets hence the name for his weekend of pizza pies! You can see some of coach's pizzas below. His was with pine nuts and prosciutto, Muenster cheese, and spicy marinara at about 425 F. The point of this particular recipe is to show you with coach's help that you too can use a cast iron skillet to make something really yummy using Bucket of Bread. Seriously, these things are pretty amazing and your dough won't stick! As for toppings, just put on what you want and experiment. Here's something Bucket of Bread did which turned out pretty tasty. Thank you for the cooking lessons, coach!
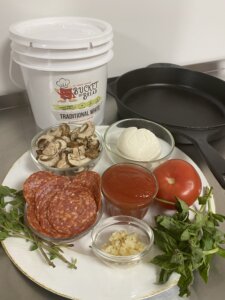
Ingredients
- Bucket of Bread, Traditional White
- Mozzarella
- Tomato Sauce
- Fresh Oregano
- Spicey Calabrese
- Tomato
- Diced Garlic
- Sliced Portobello Mushrooms
- Fresh Basil
Instructions
- Gather up your ingredients and your already made Bucket of Bread brand dough mix.
- Preheat oven to 425 F.
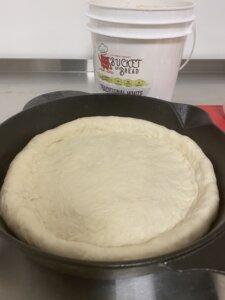
- Take out a dough ball (about 1 pound).
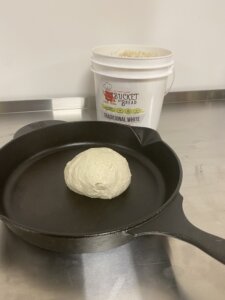
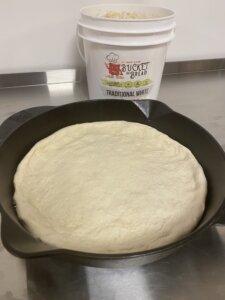
- Spread the dough evenly onto the pan.
- Cut up some real mozzarella.
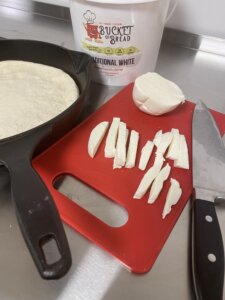
- Line up the cheese around the edge of your pizza crust.
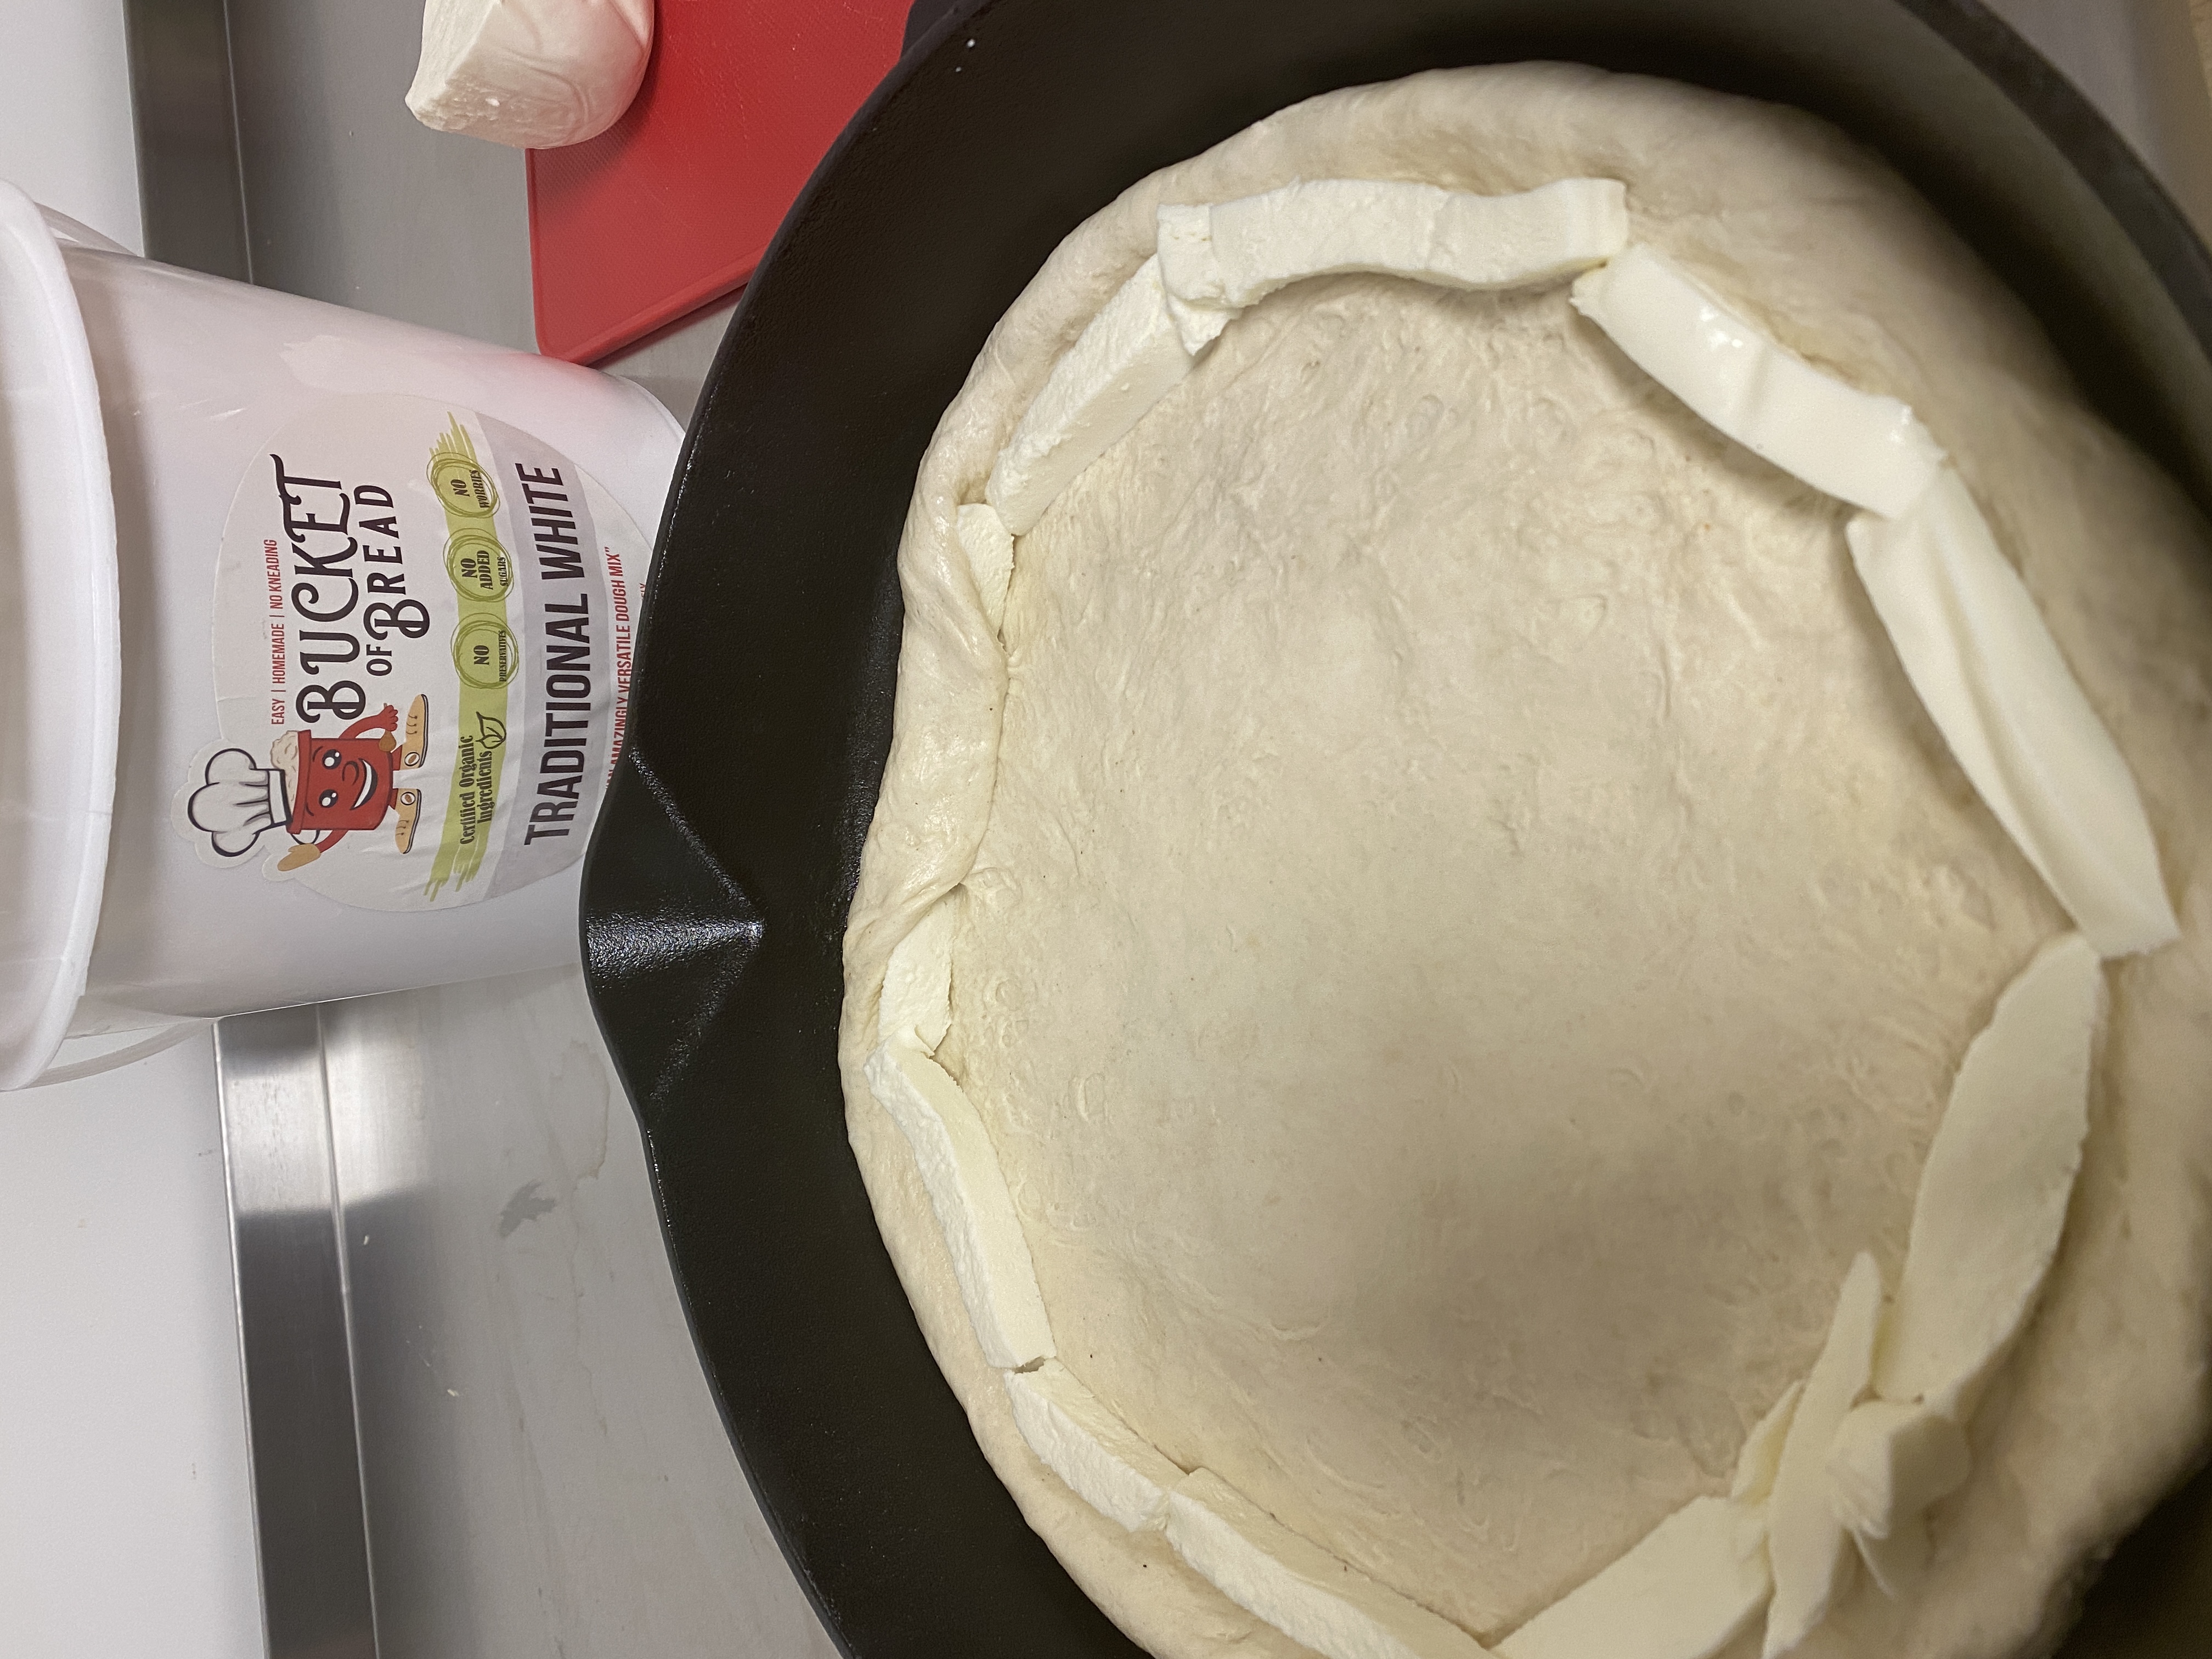
- Fold the edges over the cheese ring and you will have a stuffed crust!
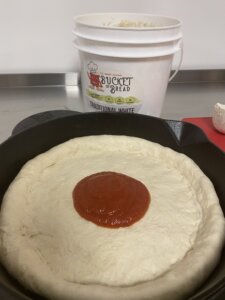
- Add your sauce.
- Sprinkle with some fresh oregano.

- Add some spicy calabrese.

- How about some tomato slices too?

- More mozzarella!

- Add some garlic to the crust edge.

- Portabella mushrooms.

- Adding some fresh basil.

- Covering it all with more mozzarella!

- Bake around 30 minutes at 425 F.
- After 30, add 2-3 minutes on broil to give some extra browning.
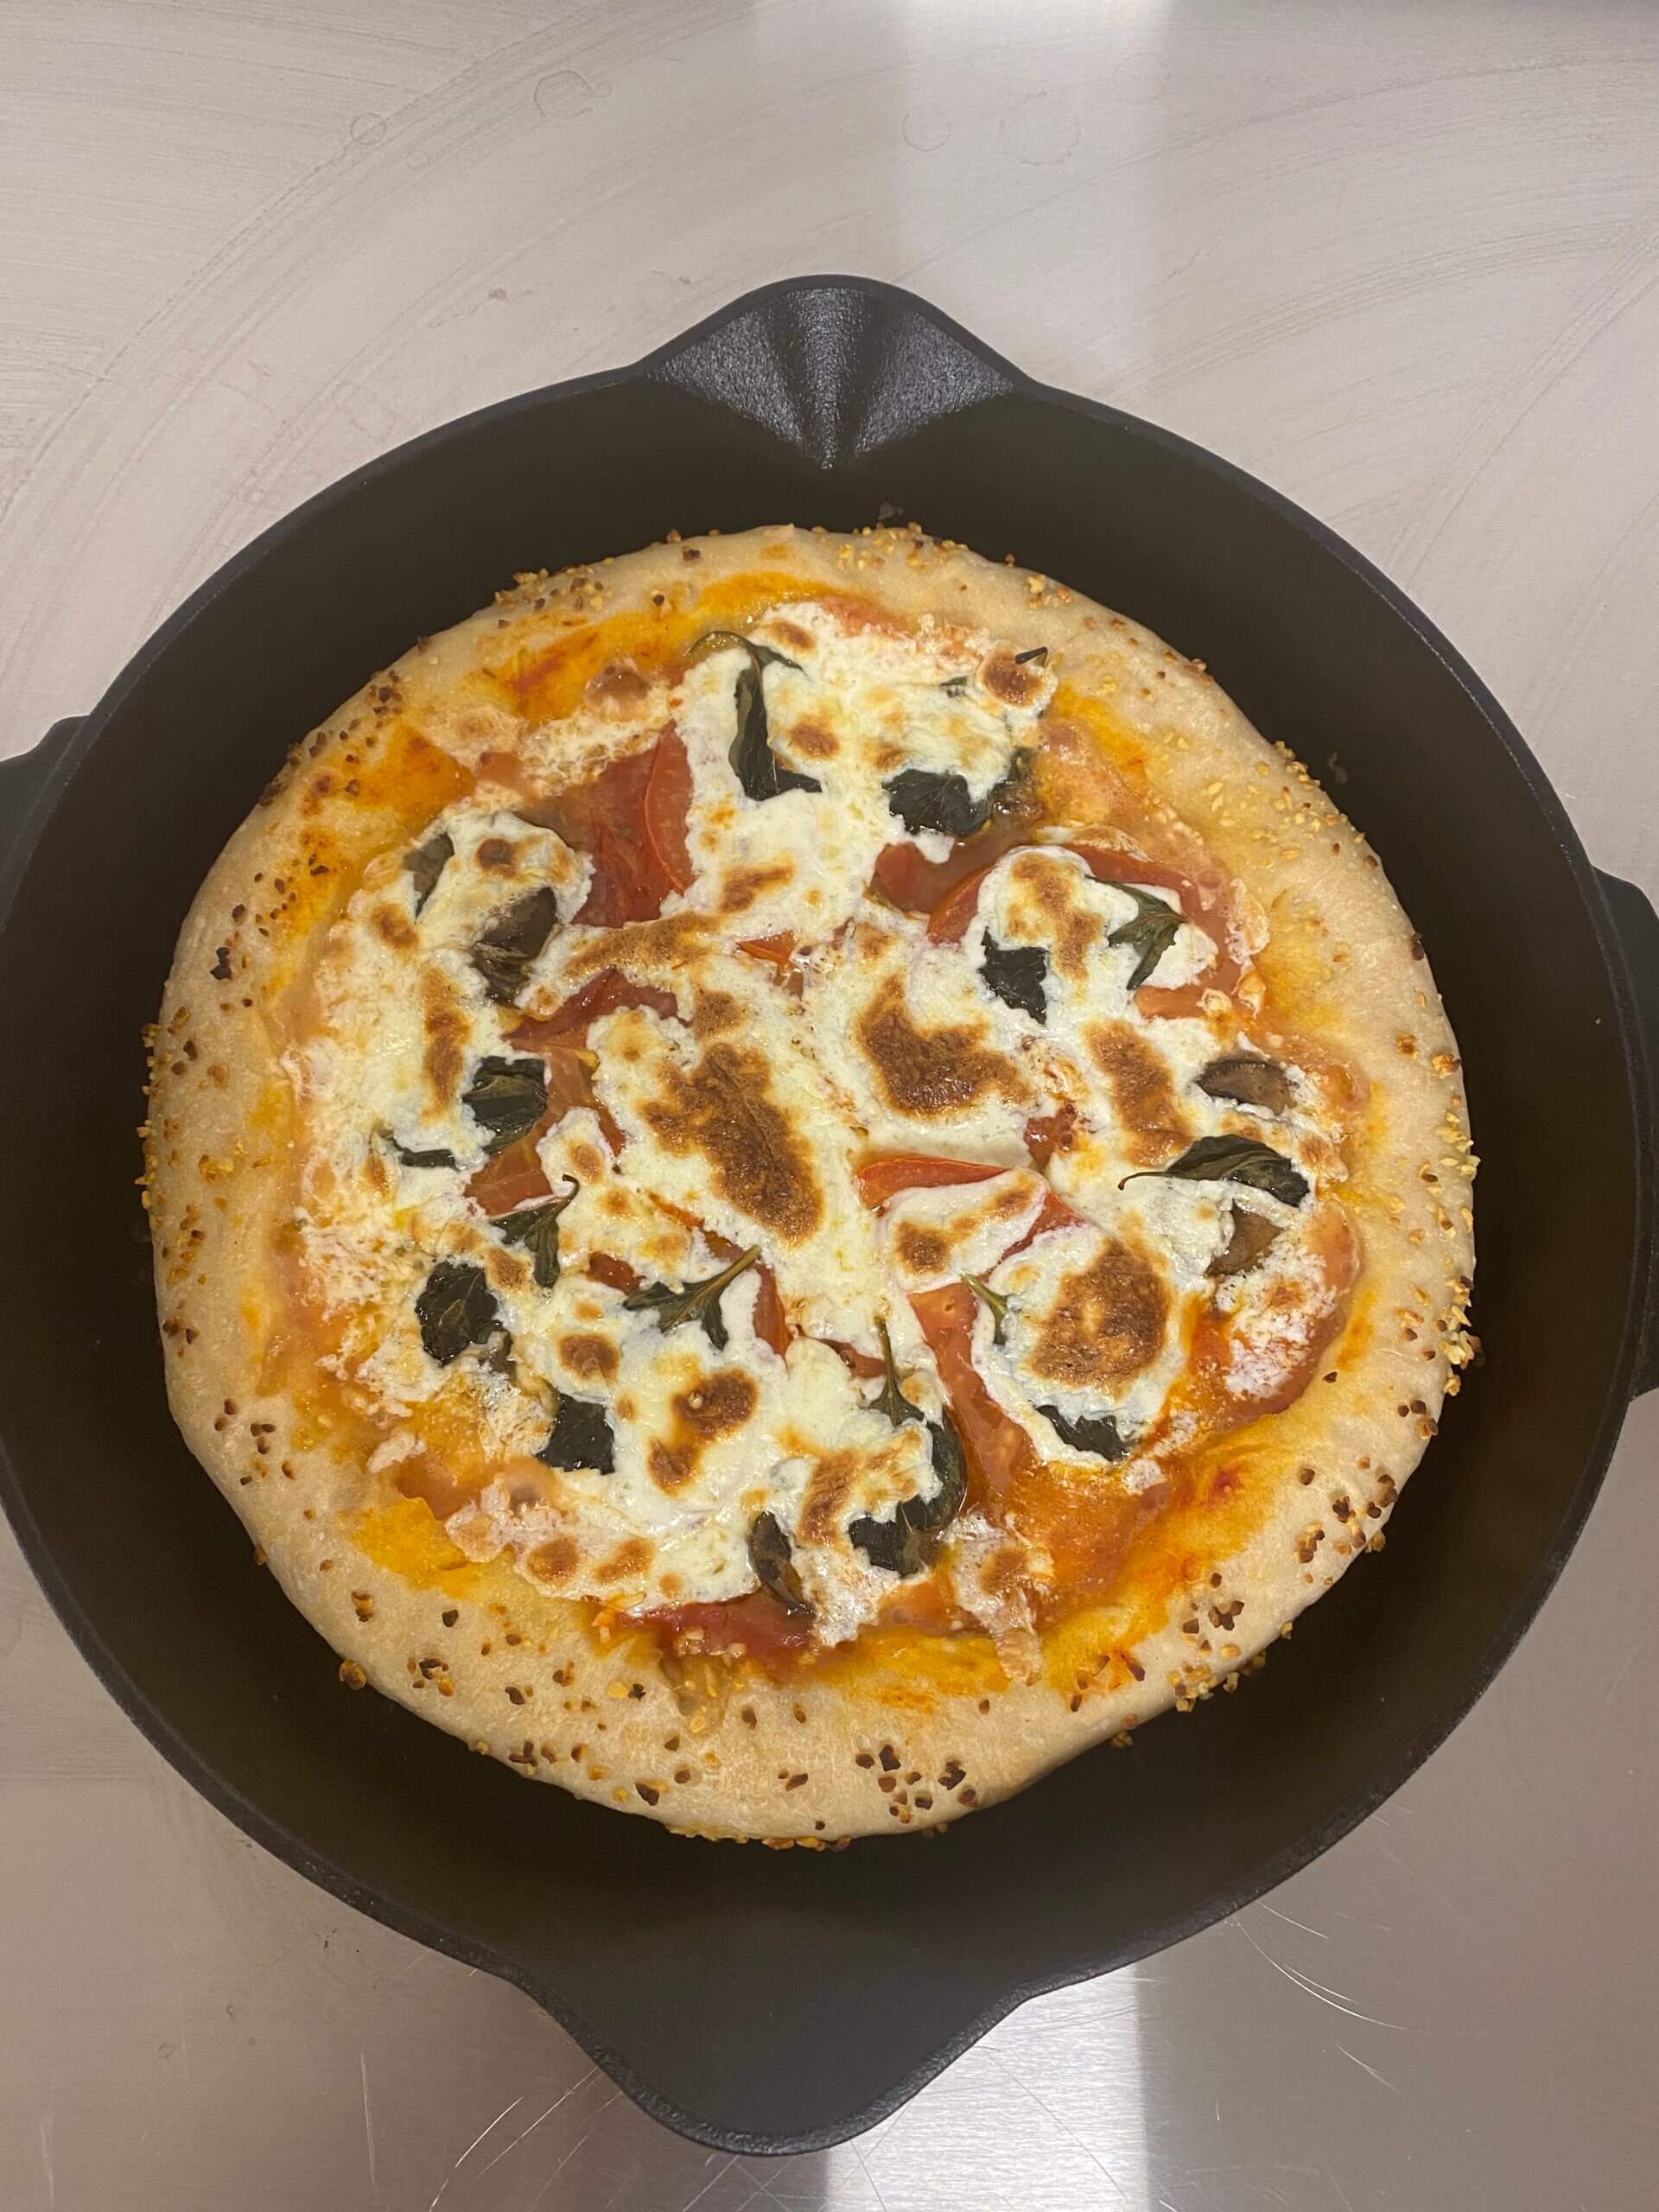
- Use a spatula to remove (no stick!). Eat and enjoy!

Coach's Videos can also be found in the Hashtag Museum at Bucket of Bread!
- Hot stuff!
- Coach used some pine nuts! Mmmm 🙂
- Use #BucketofBread on Instagram to upload your own videos to the site!
Notes
Random Cast Iron Skillet Internet Facts:
- Cast iron is tough as nails! There's a reason why there are 75-year-old cast iron pans kicking around at yard sales and antique shops. The stuff is built to last and it's very difficult to completely ruin it. Most new pans even come pre-seasoned, which means that the hard part is already done for you and you're ready to start cooking right away.
- And as for storing it? If your seasoning is built up in a nice thin, even layer like it should be, then don't worry. It ain't gonna chip off. I store my cast iron pans nested directly in each other. Guess how many times I've chipped their seasoning? Try doing that to your non-stick skillet without damaging the surface.
- The main advantage of cast iron is that it has very high volumetric heat capacity, which means that once it's hot, it stays hot. This is vitally important when searing meat. To really heat cast iron evenly, place it over a burner and let it preheat for at least 10 minutes or so, rotating it every once in a while. Alternatively, heat it up in a hot oven for 20 to 30 minutes (but remember to use a potholder or dish towel!)
- The other advantage is its high emissivity—that is, its tendency to expel a lot of heat energy from its surface in the form of radiation. Stainless steel has an emissivity of around 0.07. Even when it's extremely hot, you can put your hand close to it and not feel a thing. Only the food directly in contact with it is heating up in any way.
- Cast iron, on the other hand, has a whopping 0.64 emissivity rating, which means that when you're cooking in it, you're not just cooking the surface in contact with the metal, but you're cooking a good deal of food above it as well. This makes it ideal for things like making hash or pan roasting chicken and vegetables.
- Your cast iron pan may be really really really non-stick (non-stick enough that you can make an omelet in it or fry an egg with no problem). It's not anywhere near as non-stick as, Teflon, a material so non-stick that we had to develop new technologies just to get it to bond to the bottom of a pan. As your cast iron pan is well seasoned and you make sure to pre-heat it well before adding any food (except for baking like this pizza recipe), you should have no problems whatsoever with sticking.
- Seasoning is actually not a thin layer of oil, it's a thin layer of polymerized oil, a key distinction. In a properly seasoned cast iron pan, one that has been rubbed with oil and heated repeatedly, the oil has already broken down into a plastic-like substance that has bonded to the surface of the metal. This is what gives well-seasoned cast iron its non-stick properties, and as the material is no longer actually an oil, the surfactants in dish soap should not affect it. Go ahead and soap it up and scrub it out. The one thing you shouldn't do? Let it soak in the sink. Try to minimize the time it takes from when you start cleaning to when you dry and re-season your pan. If that means letting it sit on the stovetop until dinner is done, so be it.
- The seasoning in cast iron is actually remarkably resilient. It's not just stuck to the surface like tape, it's actually chemically bonded to the metal. Scrape away with a metal spatula and unless you're actually gouging out the surface of the metal, you should be able to continue cooking in it with no issue.
- So you occasionally see flakes of black stuff chip out of the pan as you cook in it? It's possible that's seasoning, but unlikely. More likely, those flakes of black stuff are probably carbonized bits of food that were stuck to the surface of the pan because you refused to scrub them out with soap last time you cooked.
- The material may be the same, but the production methods have changed. In the old days, cast iron pans were produced by casting in sand-based molds, then polishing the resulting pebbly surfaces until smooth. Vintage cast iron tends to have a satiny smooth finish. By the 1950s, as production scaled up and was streamlined, this final polishing step was dropped from the process. The result? Modern cast iron retains that bumpy, pebbly surface.
- The difference is more minor than you may think. So long as you've seasoned your pan properly, both vintage and modern cast iron should take on a nice non-stick surface, but your modern cast iron will never be quite as non-stick as the vintage stuff.
- In a well-seasoned cast iron pan, the food in the pan should only be coming in contact with the layer of polymerized oil in the pan, not the metal itself. So in a perfect world, this should not be a problem. But none of us are perfect and neither are our pans. No matter how well you season, there's still a good chance that there are spots of bare metal and these can indeed interact with acidic ingredients in your food.
- For this reason, it's a good idea to avoid long-simmered acidic things, particularly tomato sauce. On the other hand, a little acid is not going to hurt it.
Best Advice for Cast Iron:
-
Season it when you get it. Even pre-seasoned cast iron can do with some extra protection. To season your pan, heat it up on the stovetop until its smoking hot, then rub a little oil into it and let it cool. Repeat this process a few times and you're good to go.
-
Clean it after each use. Clean your pan thoroughly after each use by washing it with soap and water and scrubbing out any gunk or debris from the bottom. I use the scrubby side of a sponge for this.
-
Re-season it. Rinse out any excess soap with water, then place the skillet over a burner set to high heat. When most of the water inside the skillet has dried out, add a half teaspoon of a neutral oil like vegetable, canola, flaxseed, or shortening. Rub it around with a paper towel. Continue heating the pan until it just starts to smoke then give it one more good rub. Let it cool and you're done.
-
Fry and Sear in it. The best way to keep your seasoning maintained? Just use your pan a lot! The more you fry, sear, or bake in it, the better that seasoning will become.
-
Don't let it stay wet. Water is the natural enemy of iron and letting even a drop of water sit in your pan when you put it away can lead to a rust spot. Not the end of the world, but rust will require a little scrubbing and re-seasoning. I always dry out my pan with a paper towel and coat it with a tiny amount of oil before storage.
Tried this recipe?Let us know how it was!